Hey there! Have you ever been messing around with Generative Fill in Photoshop, trying to get it to create something perfect, but the AI just doesn’t get the vibe you’re going for? You type “a 1970s-style floral pattern,” and it gives you something that looks like your grandma’s curtains. Ugh, the struggle is real!
Well, get ready for some amazing news. Adobe just dropped a new feature in the Photoshop Beta that pretty much solves this problem, and it’s called the Reference Image tool.
How to Use Photoshop’s New Reference Image Tool?
Think of it like this: instead of just telling the AI what you want, you can now show it. You can give it a picture and say, “Hey, make it look like this.” It’s an incredible tool for getting more control over your AI creations, and honestly, it’s a ton of fun to play with.
So, let’s dive in and I’ll show you exactly how this new reference image tool works in a super simple way.
First Things First: How to Get the Reference Image Tool
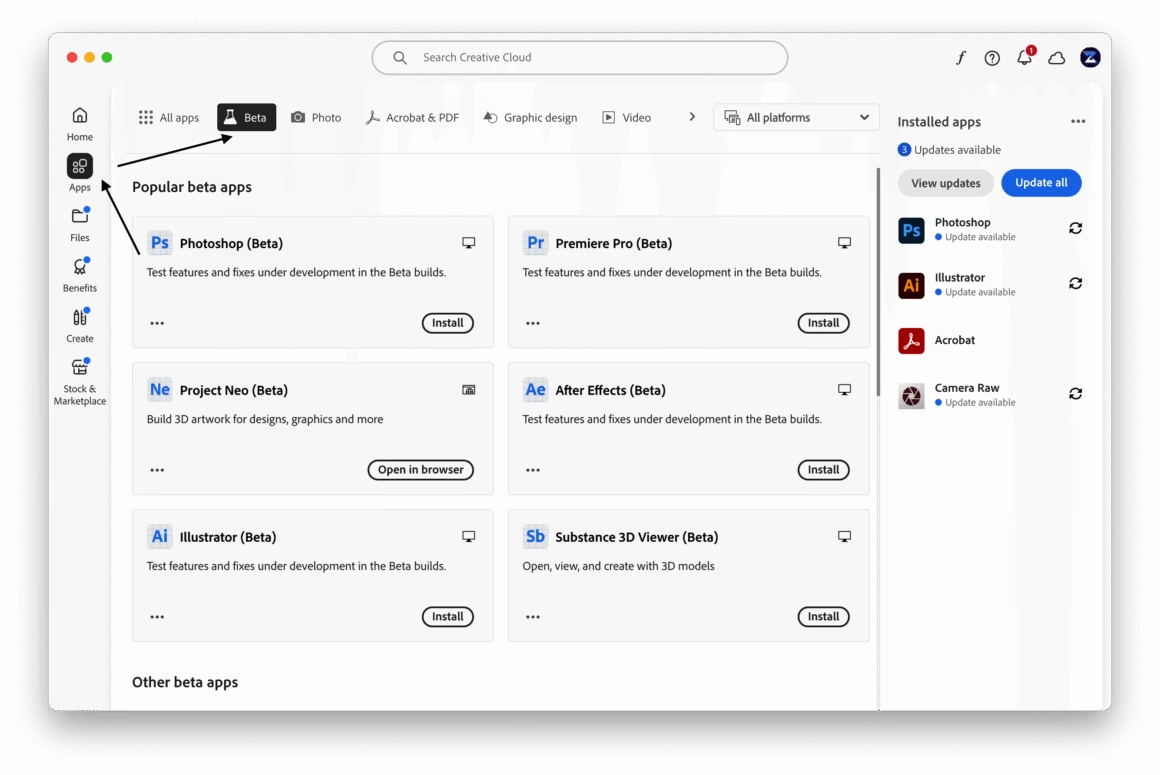
Before we start, you need to know that this awesome feature is currently only available in the Photoshop (Beta) app. Here is a complete tutorial to install Photoshop Beta. Don’t worry, it’s easy to get!
- Open your Creative Cloud desktop app.
- On the left-hand side, click on Beta apps.
- You’ll see “Photoshop (Beta)” in the list. Just click Install or Update.

Once it’s installed, open the Beta version, and you’re ready to go!
How to Use the Reference Image Tool: A Super Simple Walkthrough
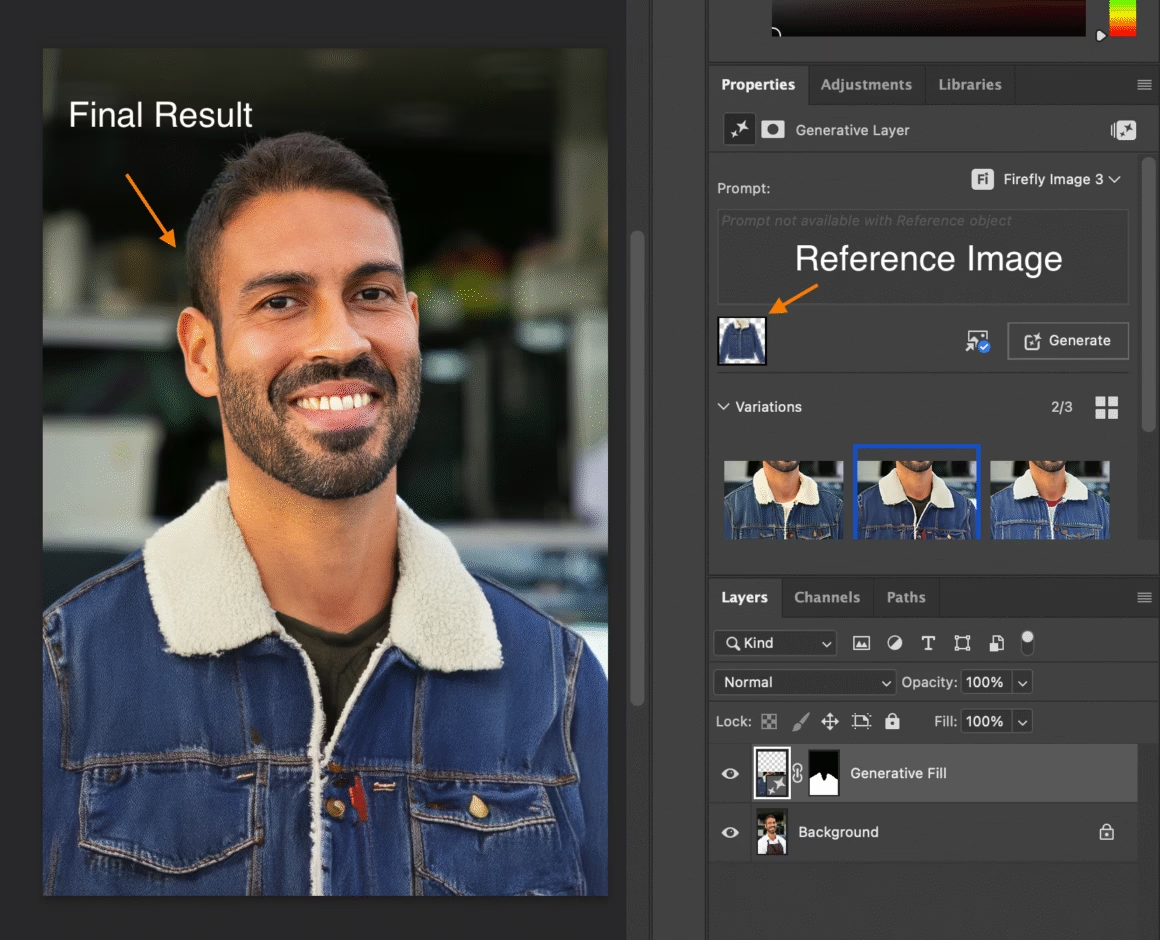
Okay, let’s try a real-world example, just like the one in the photo below. Imagine we have a photo of a person wearing a plain jacket, and we want to change it into a cool, patterned denim jacket using the reference image tool.
Step 1: Make Your Selection
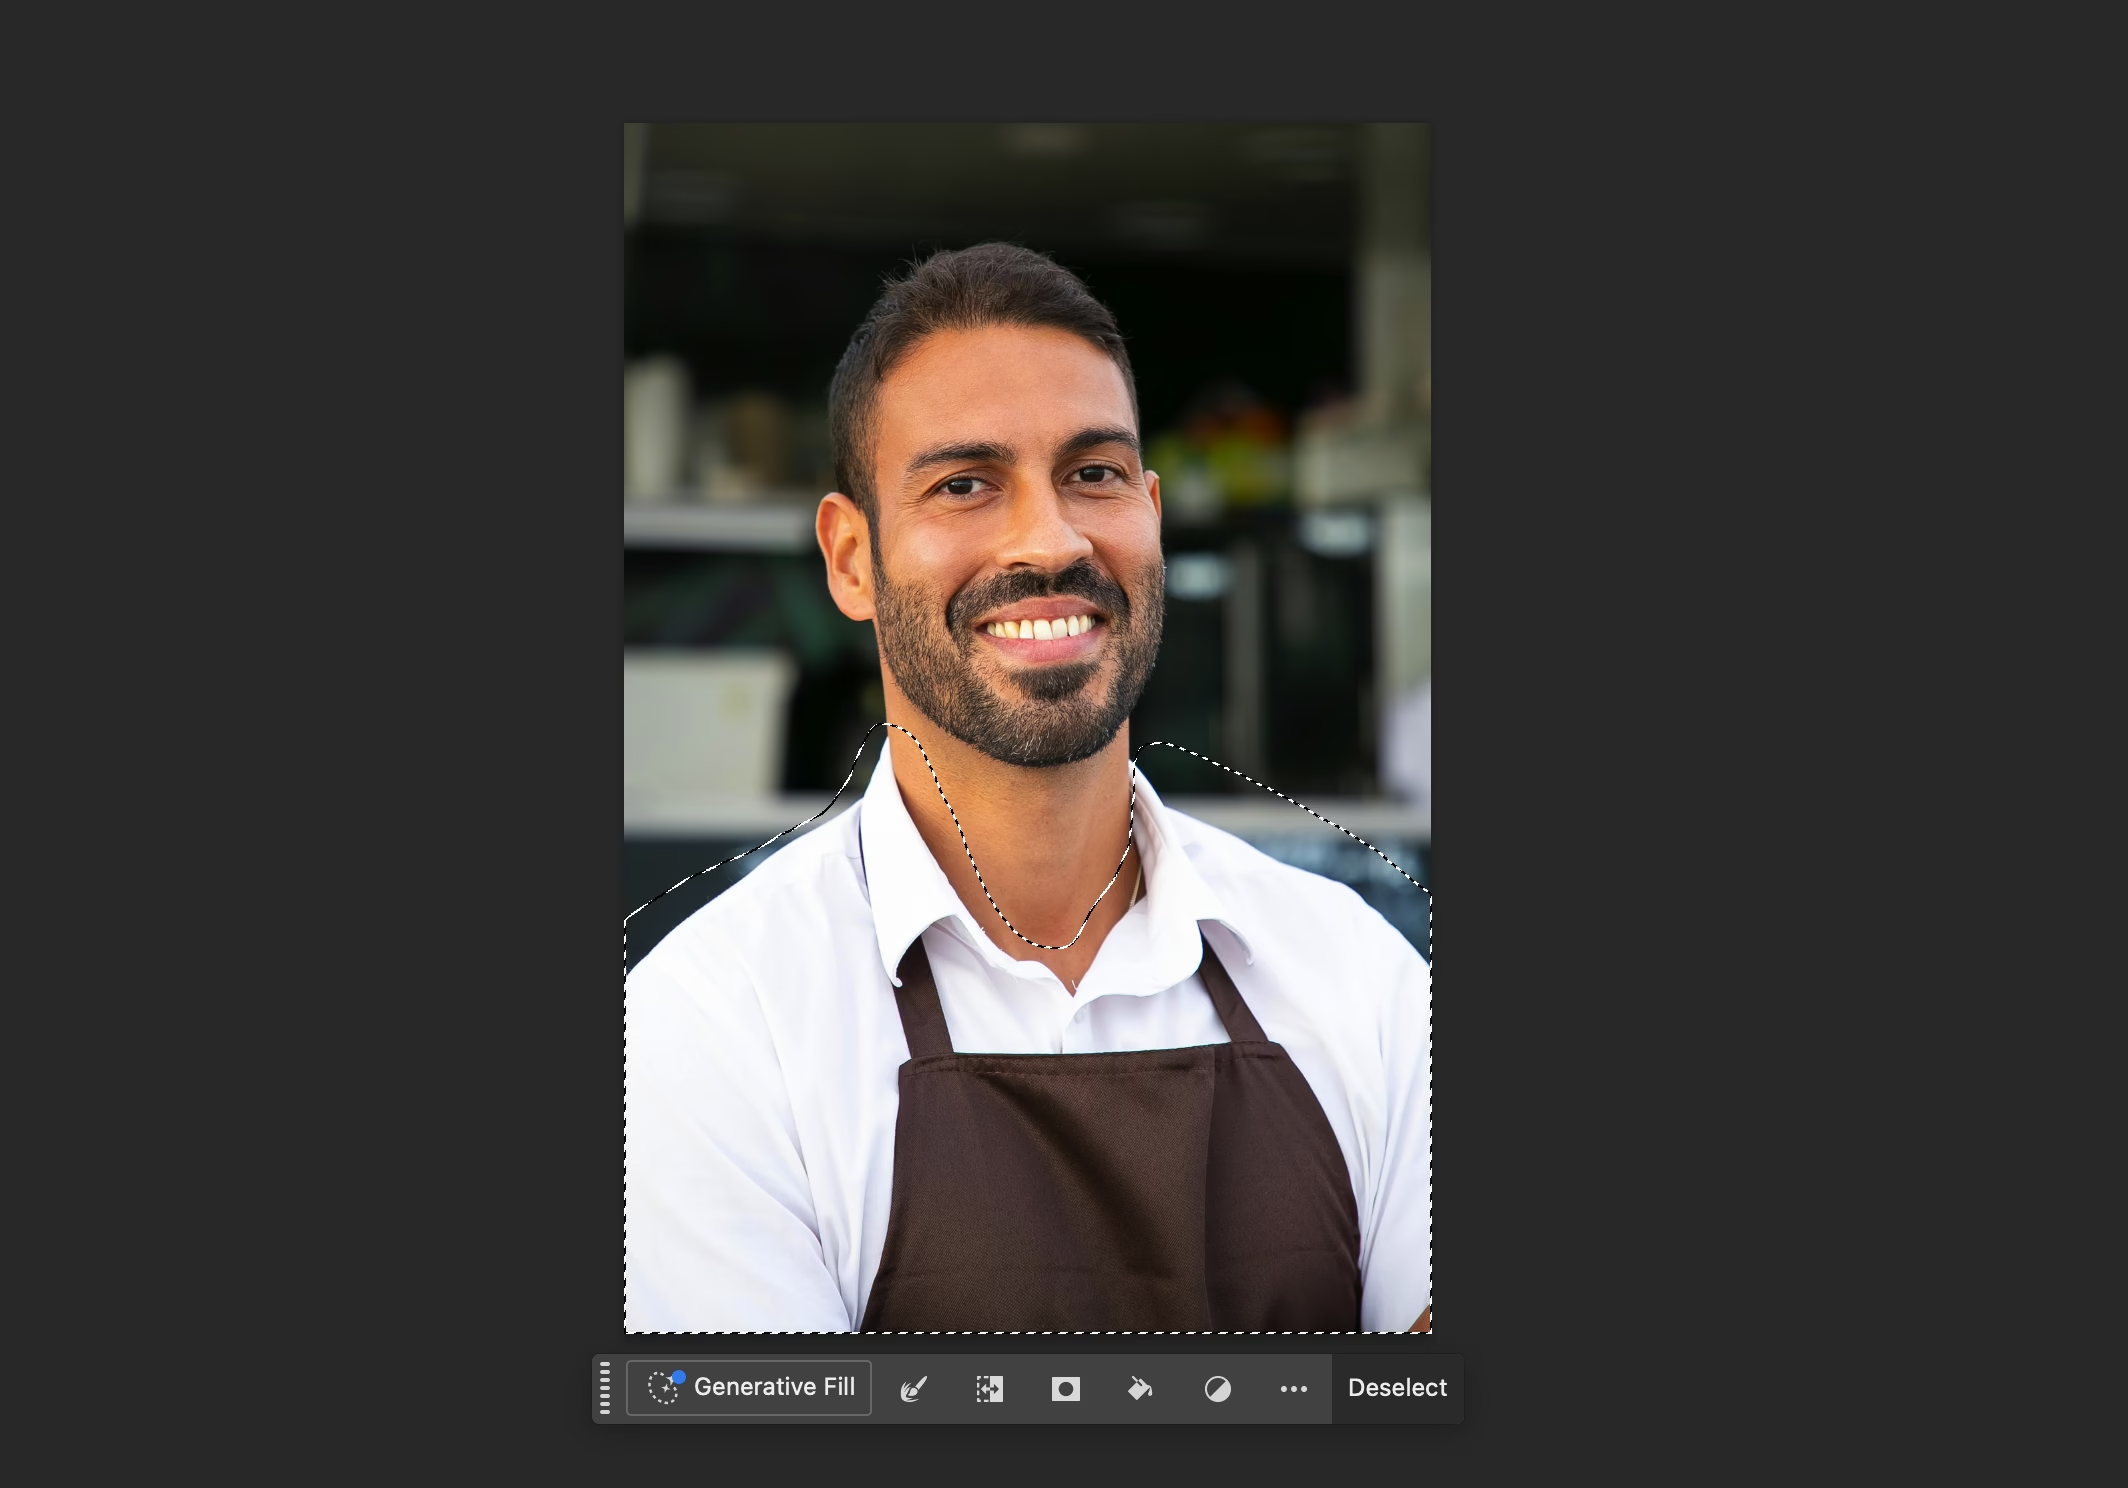
First, you need to tell Photoshop what part of the image you want to change.
I found the Lasso Tool works great for this. You don’t have to be super perfect! Just draw a rough selection around the jacket. The AI is pretty smart, so a loose selection is totally fine.

Step 2: Open Up Generative Fill
Once you have your selection, the Contextual Task Bar (that little floating bar) will pop up. Click on the Generative Fill button.

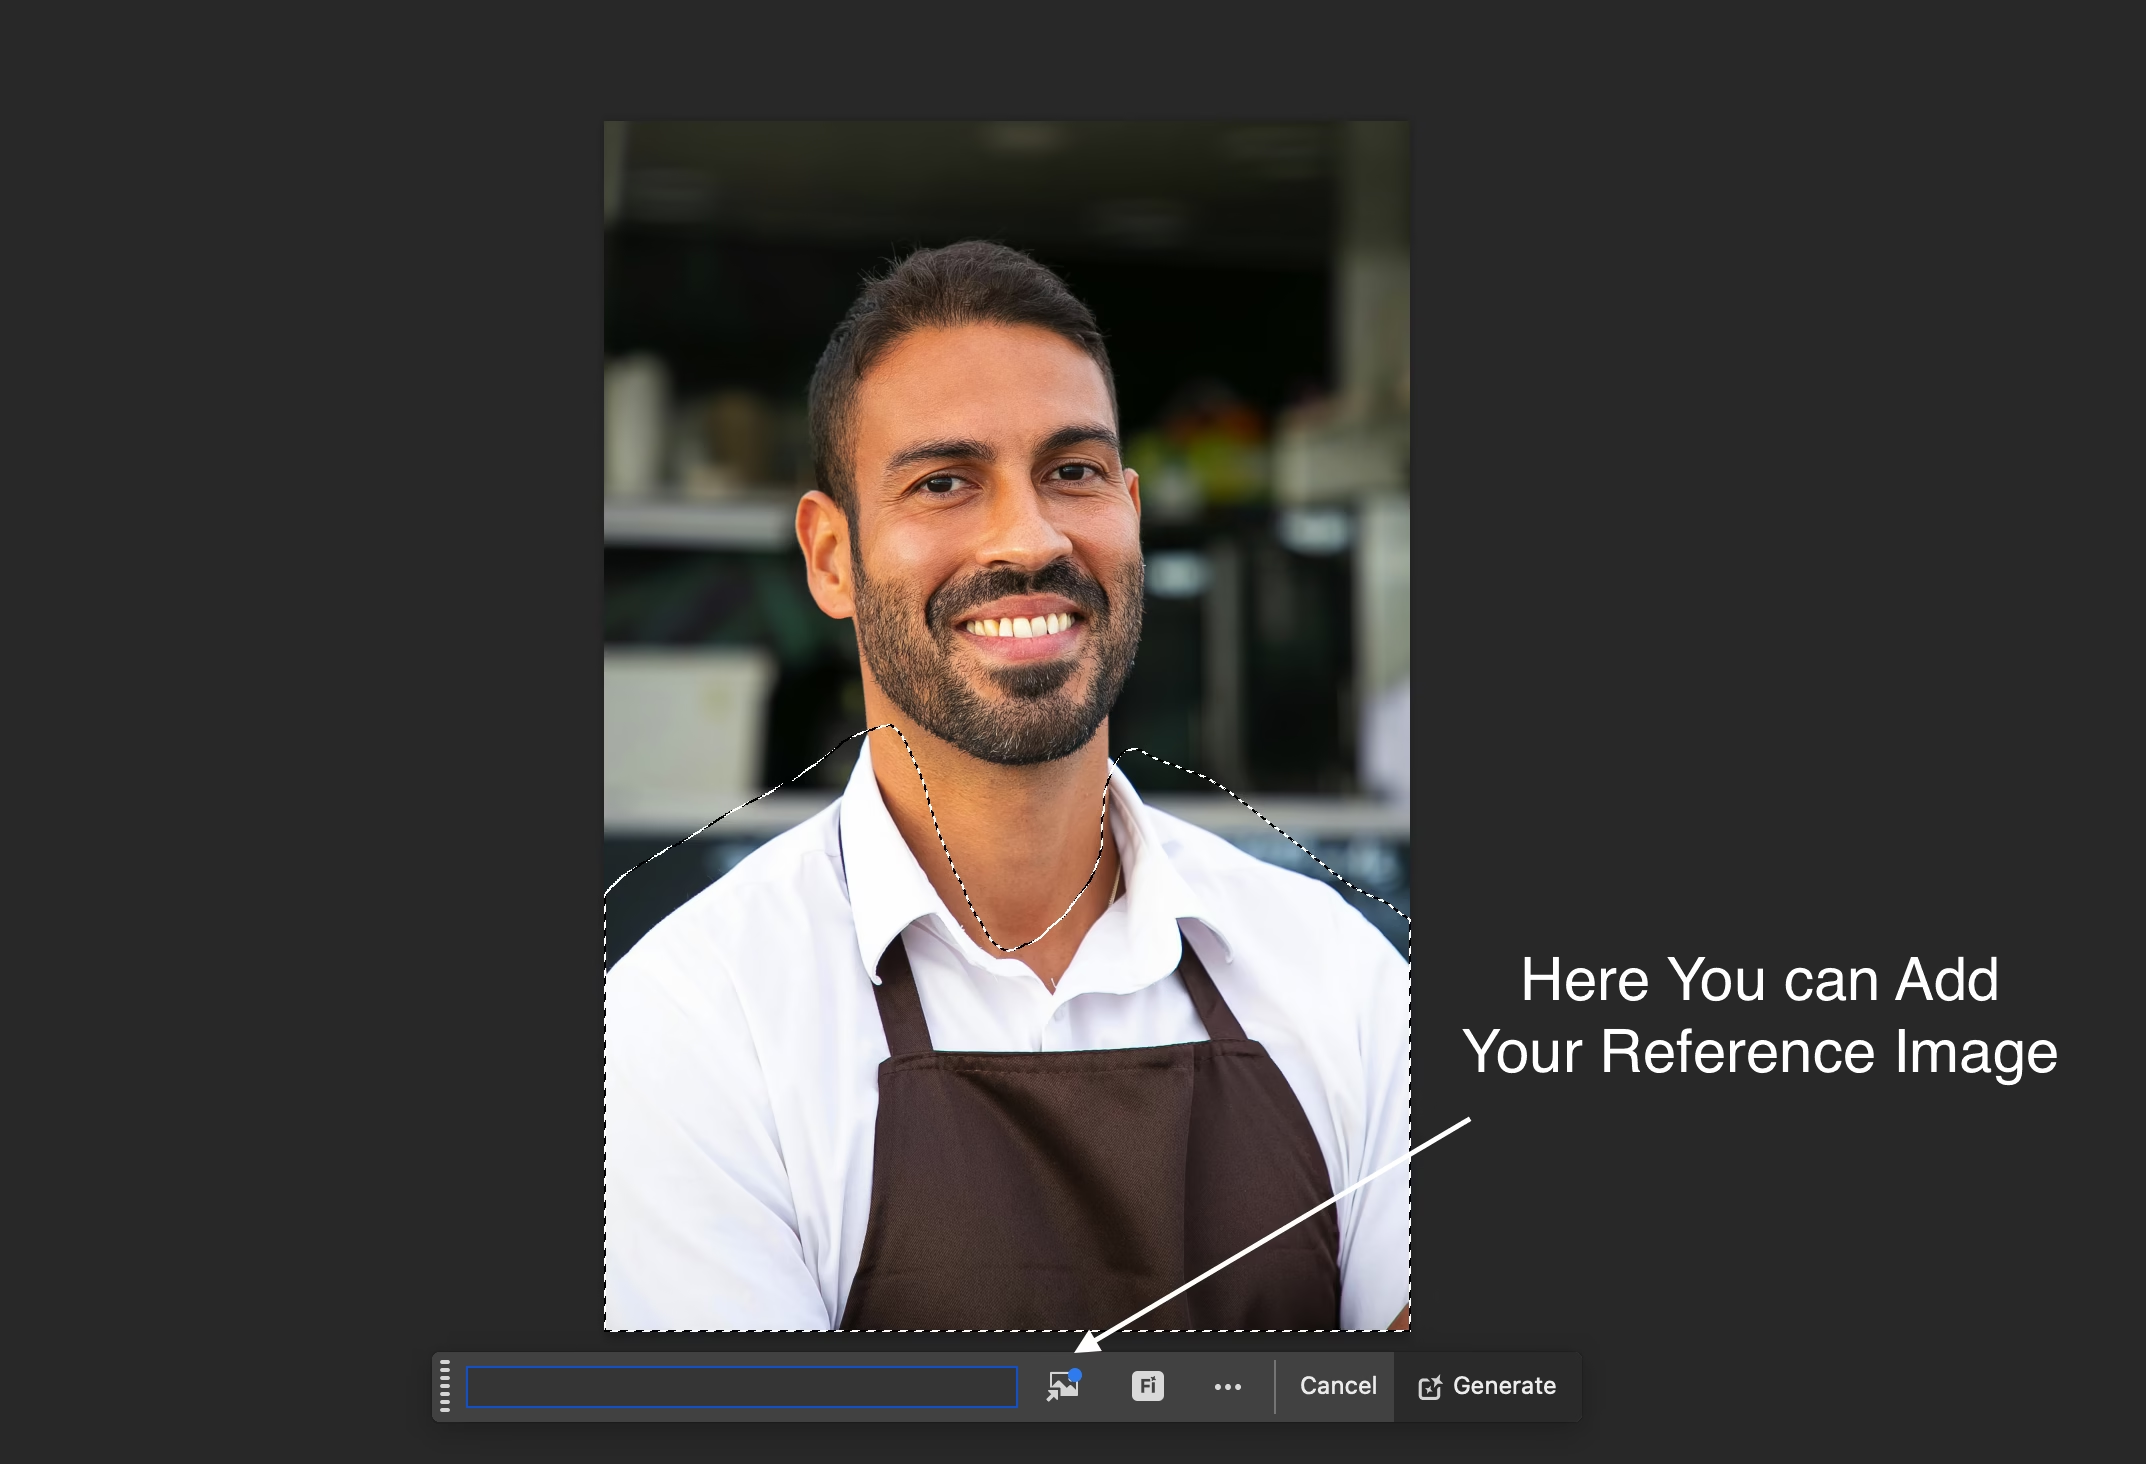
Step 3: Find the Reference Image Tool Icon
This is where the magic happens! In the Generative Fill prompt box, you’ll now see a new little icon that looks like a picture. That’s the button for the Reference Image tool. Click on it!

Step 4: Choose Your Reference Picture
Now you can pick the image you want the AI to learn from. I’m going to choose a picture of a cool denim jacket with a distinct pattern. You can pick any image from your computer to use with the reference image tool.
Once you’ve selected your reference image, you’ll see a little thumbnail of it in the prompt box.
Step 5: Write a Simple Prompt (or Don’t!)
Here’s a pro tip I picked up from testing this. When you’re using a reference image, you don’t need a super-detailed prompt. The image is doing most of the work!
I’m just going to type something simple like, “patterned denim jacket.” Sometimes, you don’t even need to write anything at all!
Step 6: Click Generate and See the Magic!
Now, just hit the Generate button and let Photoshop do its thing.
In a few seconds, it will give you a few different versions to choose from in the Properties panel. And wow! When I did this, Photoshop didn’t just change the color, it understood the texture, the style, and the pattern from my reference image and applied it to the jacket in the photo, complete with realistic lighting and shadows. It’s seriously impressive.

Cool Ways You Can Use the Reference Image Tool
Okay, so changing a jacket is cool, but this tool is useful for so much more. Here are a few ideas to get your creativity flowing with the reference image tool:
- Create Awesome Textures: Need to fill an area with a specific texture, like rusty metal, old wood, or cracked concrete? Just find a picture of that texture and use it as your reference.
- Match an Art Style: Find a painting from an artist you love (like Van Gogh or Monet) and use it as a reference to turn your own photos into paintings in that exact style.
- Design Consistent Mockups: If you’re a designer, you can use a reference image of your brand’s pattern to instantly see what it would look like on a t-shirt, a coffee mug, or a tote bag.
- Generate Unique Patterns: Select a blank area and use a reference image of a cool pattern to generate new, similar patterns. This is amazing for creating backgrounds or textile designs.
A Few Final Tips for Best Results
As I was playing around with this, I learned a few things that can help you get even better results from the reference image tool.
- Keep Your Prompts Simple: Let the reference image be the star of the show. A simple prompt like “a leather texture” or “a vintage floral pattern” is usually enough.
- Use Clear Reference Images: The better and clearer your reference image is, the better the AI will understand what you want. A high-quality image with a clear subject or texture works best.
- Don’t Be Afraid to Regenerate: Just like with regular Generative Fill, don’t be shy about hitting that “Generate” button again to get more options. Sometimes the perfect result is just one more click away.
- Remember, It’s a Beta! This feature is still new and learning. Sometimes it might give you a weird result, but that’s part of the fun! Just keep experimenting.
Related: Top Free AI Background Remover Tools
Honestly, the new Reference Image tool is one of the most exciting updates to Photoshop in a long time. It gives you so much more creative control and makes Generative Fill a thousand times more powerful. So go open up the Photoshop Beta and start playing around. You’re going to love it!
